Siemens SINUMERIK Operate
To get the latest version of the SDA_Archive application for SINUMERIK devices, please contact us at
support@softwaredefinedautomation.io.
Table of Contents
- Overview
- What's New
- Installation
- 3.1 Installed Files
- 3.2 Files Created at Runtime
- 3.3 Communication Port
- 3.4 Entering the Password
- 3.5 Version Display
- Configuration
- Backup Formats
- Storage of the Archives
- Logging
- 7.1 Simplified Logging
- 7.2 SLTrace Logging
1. Overview
SDA_Archive is a background application for creating archives for the SINUMERIK 840D sl and SINUMERIK ONE. It can run either directly on the NCU or on the IPC/PCU within the HMI Operate.
The application communicates with a TCP client, from which it receives the order to create the archive. The created archive is stored on an external Samba drive.
Certain settings and default parameters are configured in a configuration file.
SDA_Archive is controlled via incoming TCP packets. These packets transmit the required information and trigger the creation of an archive. SDA_Archive then sends TCP packets back containing information such as the current status.
Note: The amount of data backed up in an archive is not checked by SDA_Archive. It is the user's responsibility to ensure that there is enough storage space on the local data carrier and on the target directory for a created archive.
Note: The runtime option P60 (SINUMERIK Integrate Run MyHMI /3GL) is required on the target system in order to run the application.
2. What's New
2.1 Version 1.0.0.0 — Basic Functions
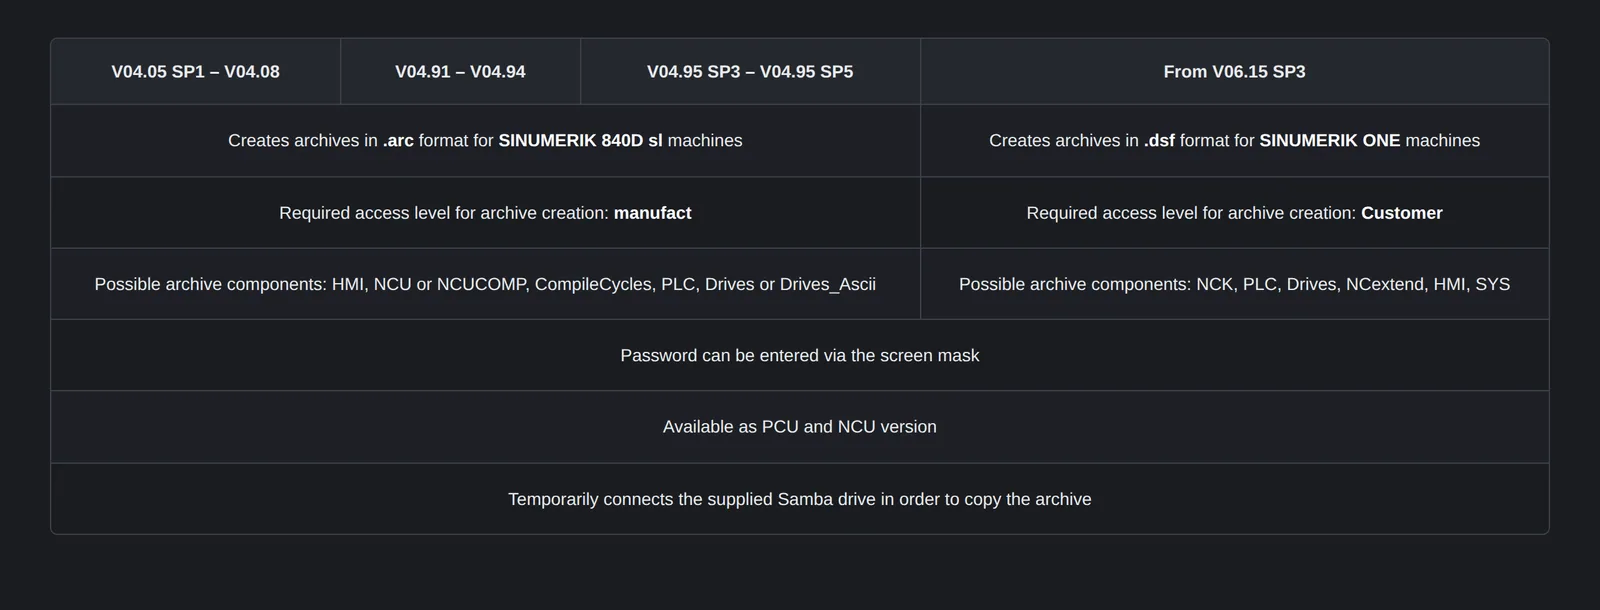
Due to compatibility with SINUMERIK Operate, there are 4 version-dependent packages for specific HMI Operate versions.
The respective folders contain files for both the PCU50/IPC (Windows) and the NCU (Linux).
3. Installation
The installation path depends on the target hardware on which SDA_Archive is installed.
In the following text, the placeholder <InstallationPath> stands for the installation directory of SINUMERIK
Operate, that is:
C:\Program Files (x86)\Siemens\MotionControl\when installing on a PCU50 / IPC with the operating system Win7/Win10\card\when installing on an NCU.
Steps:
- Unpack the supplied ZIP file into any directory.
- For an installation on an NCU, it is necessary to establish a connection to the target hardware using an SCP client (
e.g., WinSCP):
- User:
manufact - Password:
SUNRISE(or current manufacturer password)
- User:
- Copy all folders located under
hmito:<InstallationPath>oem\sinumerik\hmi
CAUTION: If a file named
systemconfiguration.inialready exists in the folder<InstallationPath>oem\sinumerik\hmi\cfg, back up this file before copying. After copying, merge the new file with the backed-up one.
The following entry must be present:
[oem_dirs]
OEM_1=sda_archive
If an entry with the section [oem_dirs] already exists, then only adopt the entry OEM_1=sda_archive and adjust the
number after OEM_,
e.g.: OEM_2=sda_archive
3.1 Installed Files
<InstallationPath>oem\sinumerik\hmi\sda_archive\
versions.xml
<InstallationPath>oem\sinumerik\hmi\sda_archive\appl
libSDA_Archive.so(NCU)SDA_Archive.dll(PCU/IPC)sda_archivedialog.hmiversions.xml
<InstallationPath>oem\sinumerik\hmi\sda_archive\cfg
sda_installation.inisda_tempinfo.inisystemconfiguration.ini
<InstallationPath>oem\sinumerik\hmi\sda_archive\lng
sda_archivedialog_deu.qmsda_archivedialog_eng.qm
3.2 Files Created at Runtime
- Temporary information about a currently running archive is stored in a local configuration file:
<InstallationPath>oem\sinumerik\hmi\sda_archive\cfg\sda_tempinfo.ini - Temporary storage of the archive before it is copied to the target directory: each HMI Operate has a temporary directory in its installation path.
3.3 Communication Port
The SDA_Archive application listens for incoming TCP packets sent by a TCP client. In order for these packets to be read, a port must be opened via HMI Operate.
There are several options for this, which depend on the HMI Operate version and target system. They can be found in the document "SINUMERIK 840D sl SINUMERIK Operate (IM9)" under Configure Network > Settings of the company network:
-
Via HMI Operate
Under Commissioning > Network > Company > Change, you can open additional ports. For example,
TCP/8080must be added if port 8080 has been set in the configuration file. The computer must then be restarted. -
Via the configuration file
<InstallationPath>user\system\etc\basesys.iniThe configuration file can be accessed through the file system, and the port entry can be added at the commented location, for example:
; Protocol/Port pairs to open in the firewall (e.g., TCP/5900, UDP/514, ...)FirewallOpenPorts=TCP/22 TCP/8080 TCP/102 TCP/5900
On a PCU/IPC under Windows, this depends on the firewall settings, and it may be possible to use the port without any change.
3.4 Entering the Password
To create an archive, the access level manufact is required under HMI Operate 4.x, and the access level Customer under HMI Operate 6.x. The SDA_Archive application sets the access level shortly before archiving and clears it again after the archiving has been triggered.
By default, the password set at the factory is used. To change the password, an additional screen mask can be activated during commissioning, allowing the new password to be entered. It is then stored in encrypted form.
The screen mask is activated by removing the comment characters ; in
<InstallationPath>oem\sinumerik\hmi\sda_archive\cfg\systemconfiguration.ini,
and becomes selectable in the menu after the next restart of the HMI.
Before — comments active, password mask disabled:
;[areas]
;AREA0550= name:=SDA_Archive, dialog:=SDA_Archivedialog, panel:=SlHdStdHeaderPanel
After — comments removed, password mask shown:
[areas]
AREA0550= name:=SDA_Archive, dialog:=SDA_Archivedialog, panel:=SlHdStdHeaderPanel
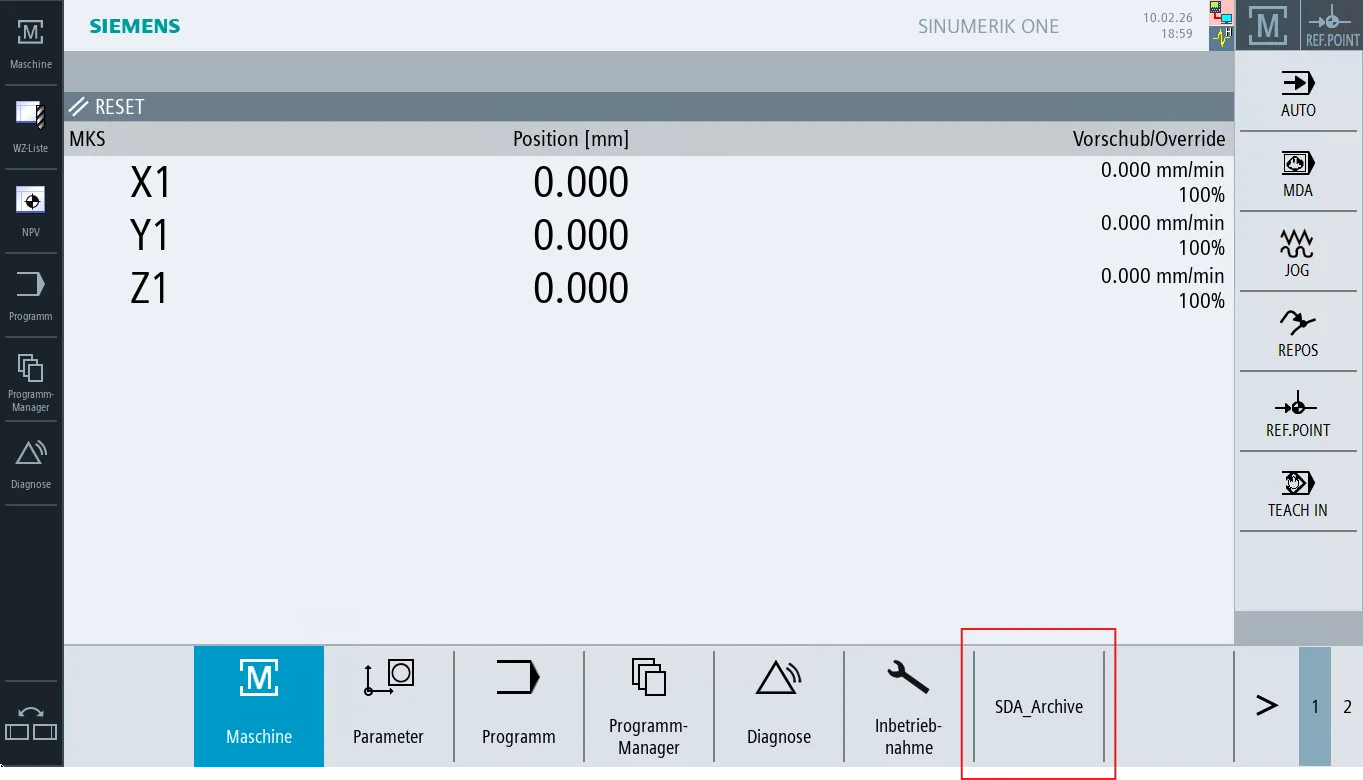
The screen mask now appears on the next free area-menu softkey labeled SDA_Archive. Pressing the softkey opens the screen for entering the password.
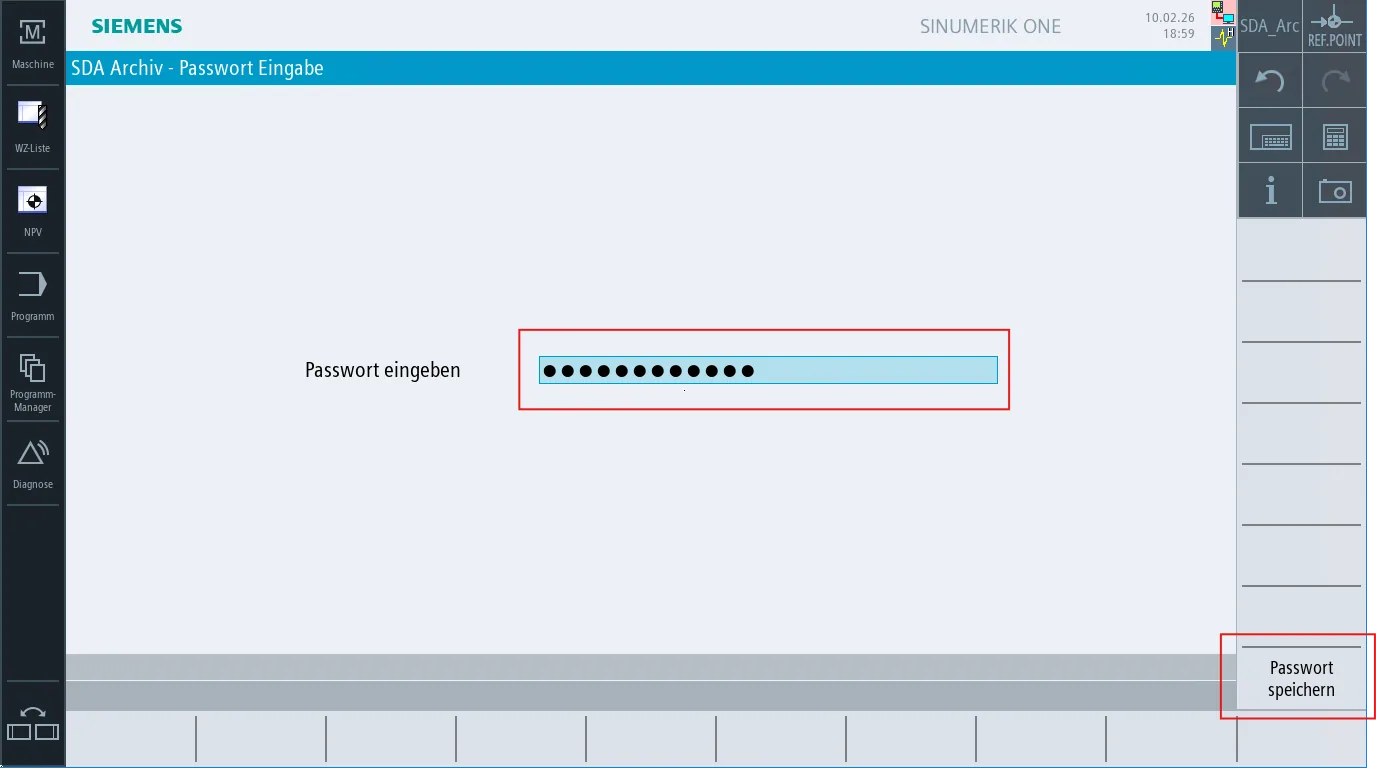
The previous password is never displayed. An empty input field is shown, into which the password can be entered. Using the softkey "Save Password", the previous password is overwritten.
3.5 Version Display
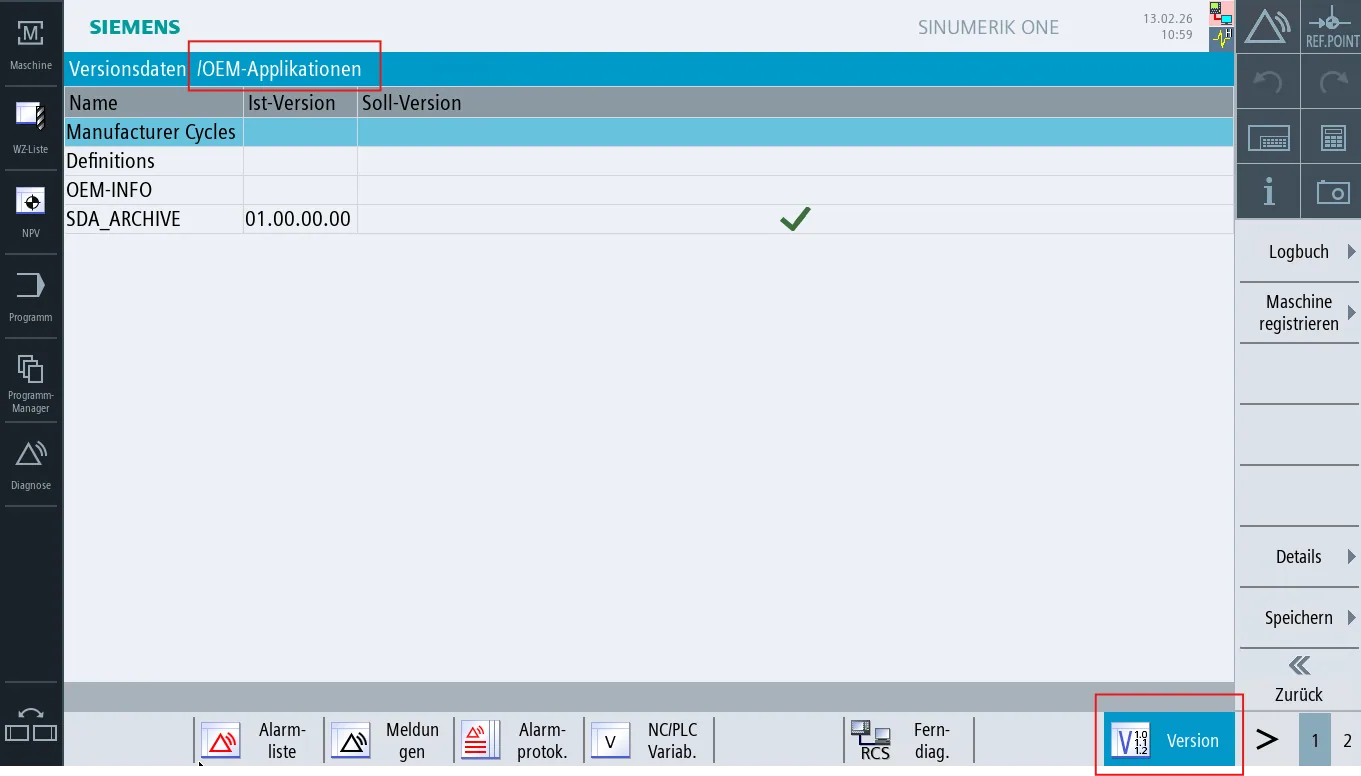
The version of the application is displayed in HMI Operate under Diagnostics > Version, listed under the OEM applications.
4. Configuration
SDA_Archive is configured via the configuration file sda_installation.ini. This file is located in the
directory:
<InstallationPath>oem\sinumerik\hmi\sda_archive\cfg.
Default entries can also be stored here that do not need to be sent via TCP communication. If the entries are nevertheless sent via TCP, the values from the TCP packet are used.
4.1 Structure of the Configuration File
The initialization file sda_installation.ini defines the appearance of the screens and the data to be backed up.
The initialization file is divided into 3 sections:
- The section
[Network]contains the settings for communication with the TCP client that initiates the orders. - The section
[Config]allows the path for storing a simplified user log file to be configured.
Comment lines are introduced by the comment character ;. The comment character must be at the very beginning of a
line. Only entire comment lines are permitted.
4.1.1 Description of the [Network] Section
| Entry | Description / Value Range | Default |
|---|---|---|
ServerPort | Port number on which the application binds to listen for TCP packets. This port must be open and configured accordingly in the platform. | 8080 |
4.1.2 Description of the [Config] Section
| Entry | Description / Value Range | Default |
|---|---|---|
LogFile | Path in which the log file is created. Entered as a relative path starting from <InstallationPath>. |
4.2 Meaning of the Components
The following component keywords are valid both in the configuration file and when sending via the TCP client:
Table 1 — Component keywords for SINUMERIK 840D sl
| Keyword | Description |
|---|---|
NCU | All NC data |
NCUCOMP | All NC data + compensation data (i.e. also includes NCU) |
PLC | PLC data |
COMPILECYCLES | Compile-cycle data |
DRIVES | Drive data (binary format) |
DRIVES_ASCII | Drive data (ASCII format) |
HMI | HMI data |
ALL | Defines the selection of the following components: NCUCOMP│PLC│COMPILECYCLES│DRIVES│HMI |
Table 2 — Component keywords for SINUMERIK ONE
| Keyword | Description |
|---|---|
NCK | All NC data |
PLC | PLC data |
DRV | Drive data (binary format) |
DRV_ASCII | Drive data (ASCII format) |
HMI | HMI data |
SYS | System settings |
NCextend | Extended NC memory |
ALL | Defines the selection of the following components: NCK│PLC│SYS│DRV│HMI |
4.3 Example
[Network]
; The TCP server listens on this port.
ServerPort=8080

[Config]
; Path of the log file.
LogFile=/oem/sinumerik/hmi/appl
5. Backup Formats
Different formats are used for archiving depending on the controller generation:
- SINUMERIK 840D sl: Backups are created as
.arcarchives. - SINUMERIK ONE: Backups are created as
.dsfarchives.
6. Storage of the Archives
For older software versions of HMI Operate, SMB v1 is required; newer versions use SMB v2/3. The server providing the network share must therefore support SMB v1/2/3.
So that no permanent connection is kept open, the connection to the Samba drive is established only after the archive has been created in a temporary folder. The archive is then moved to the remote directory, and the connection is closed again.
7. Logging
7.1 Simplified Logging
With simplified logging, basic information about the workflow and communication is written to a file. The log file is
automatically stored in the path configured in sda_installation.ini. This logging is always active and requires no
additional configuration.
7.2 SLTrace Logging
SLTrace logging is the extended variant used by all applications in Operate. Detailed internal trace information can be enabled here, which is intended primarily for developers and in-depth error analysis. This allows significantly more comprehensive and fine-grained log data to be recorded.
This trace must first be activated and configured via HMI Operate. To do so, navigate to Commissioning > HMI > Diagnostics > HMI Trace > Advanced. In the combo box at the bottom left, start in the SLTrc module.
The following settings should be activated by ticking the corresponding checkboxes:
! add: file/linenumber! add: timestamp! datasink: file
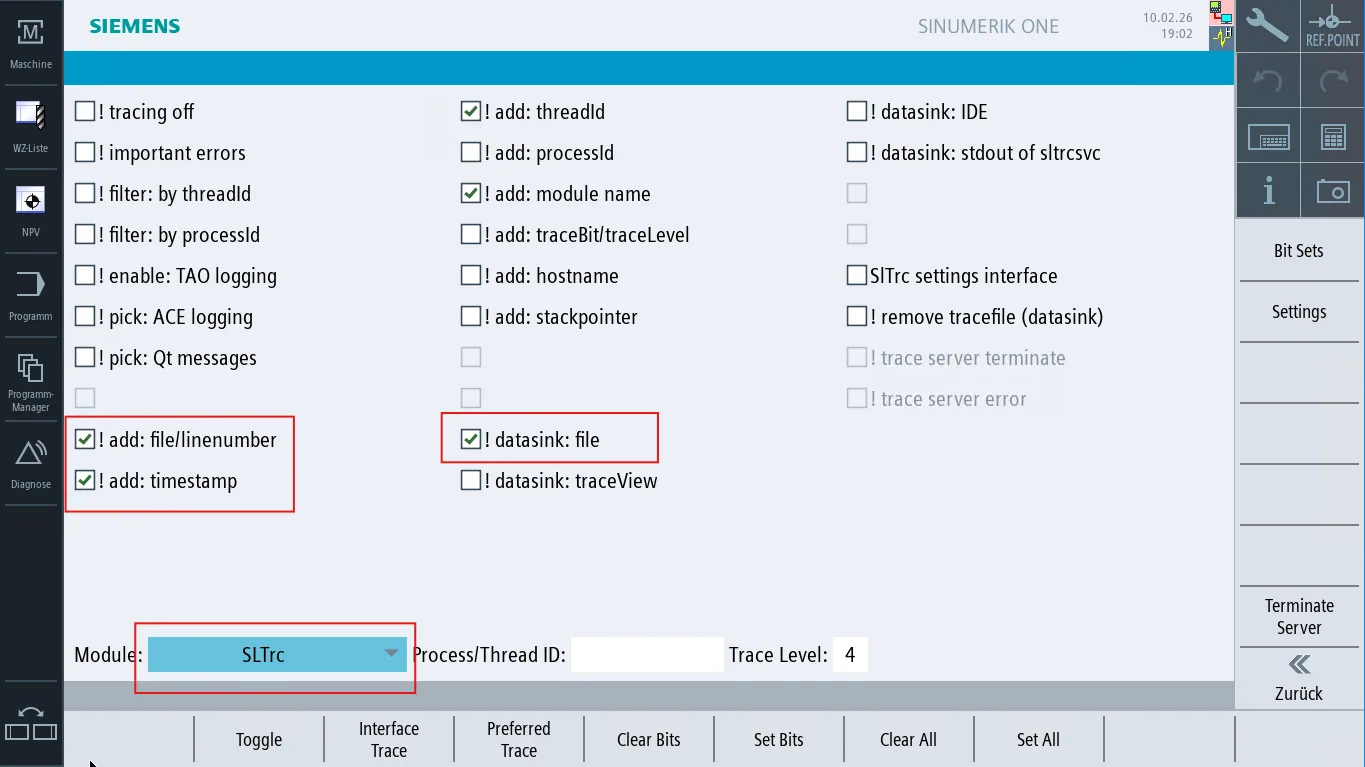
Now switch via the combo box at the bottom left to the SDA_ARCHIVE module and press the horizontal softkey " Preferred Trace", which sets the trace settings.
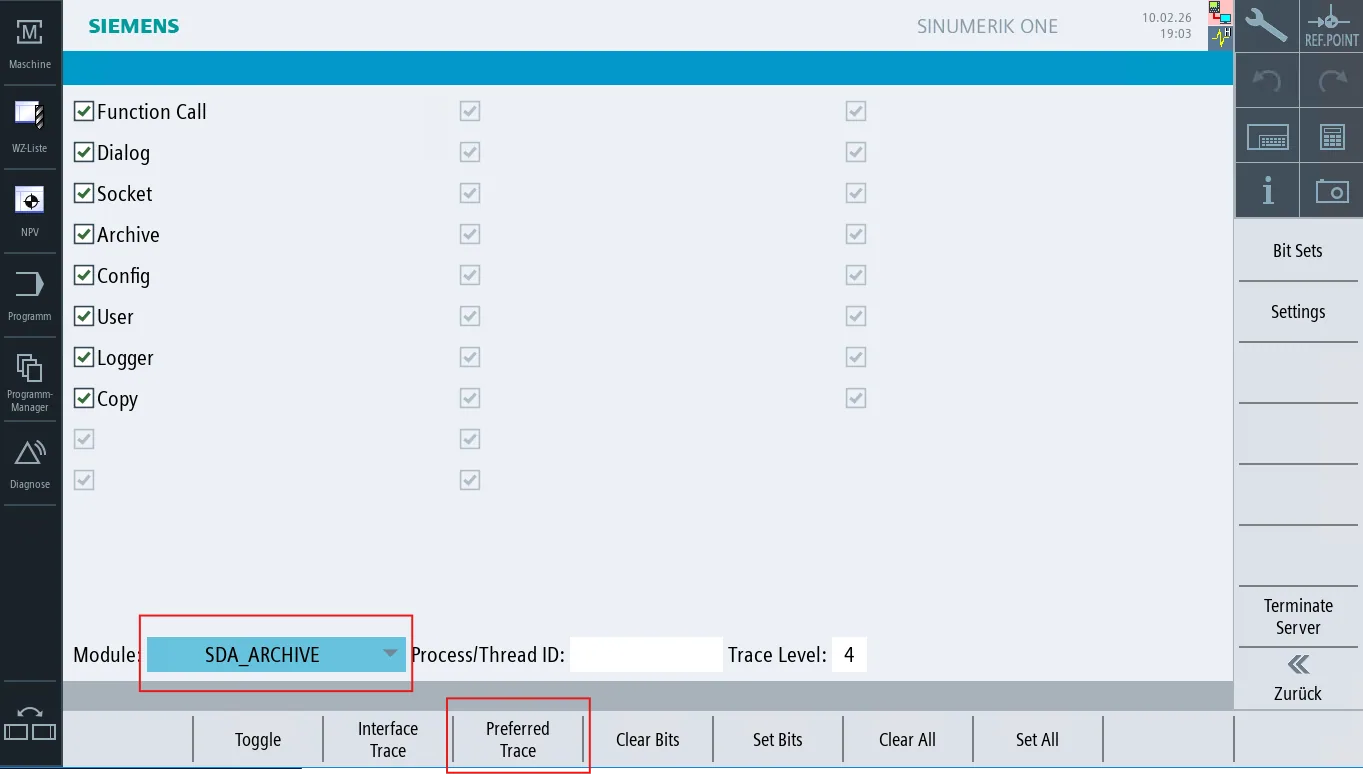
From now on, information is written to the file sltrc.out under /user/sinumerik/hmi/log/sltrc. In case of an error,
this file is relevant for development for in-depth diagnosis.